Setting Up A VPN Connection In Windows 10
Executive Summary:
The digital age has revolutionized how people work, shop, and communicate. However, this convenience comes with inherent security risks. Securing browsing and online activities requires additional layers of protection, and a VPN (virtual private network) is a robust solution. This document delves into the process of setting up a VPN connection in Windows 10, providing step-by-step guidance to ensure secure and private internet access.
Introduction:
The internet has become an essential tool for conducting business, accessing information, and staying connected with friends and family. However, with the increasing threat of data breaches, cyberattacks, and digital surveillance, it is more important than ever to protect online privacy and security. By establishing a VPN connection, individuals and organizations can encrypt their internet traffic and protect their data from unwanted access or surveillance.
1. Choosing the Right VPN Service:
Selecting a suitable VPN service is crucial for optimal security, privacy, and performance. Key considerations include:
-
Security Features: Ensure the VPN service employs robust encryption protocols such as OpenVPN and AES-256 encryption for secure data transmission.
-
Privacy Policies: Review the VPN provider’s privacy policy to ensure it clearly states that it does not collect or log user data, including browsing history, IP addresses, or DNS requests.
-
Server Network: Consider the number and location of the VPN provider’s servers to ensure access to servers in desired locations for unblocking geo-restricted content or optimizing connection speeds.
-
Connection Performance: Evaluate the VPN service’s connection speed and stability to minimize the impact on internet browsing and streaming.
-
Customer Support: Choose a VPN service that offers reliable and responsive customer support in case of any technical issues or inquiries.
2. Downloading and Installing a VPN Client:
-
Select Your Preferred VPN: Start by choosing a VPN service that meets your security, privacy, and performance requirements.
-
Download the VPN Client: Most VPN services provide dedicated VPN clients compatible with various operating systems, including Windows 10. Download the appropriate client for your device from the VPN provider’s website.
-
Install the VPN Client: Once the VPN client is downloaded, follow the on-screen instructions to install the software. Typically, this involves accepting the terms of service, selecting the installation location, and providing administrator permissions if prompted.
-
Restart Your Computer: After the VPN client is installed, restart your computer to ensure proper integration with your system.
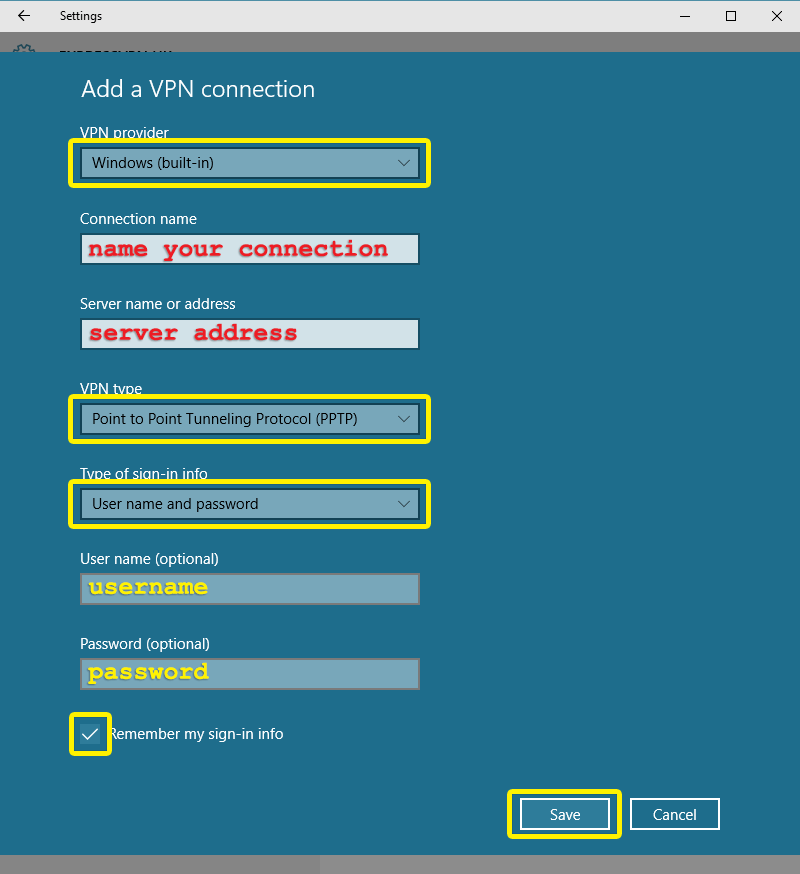
3. Configuring and Connecting to a VPN Server:
-
Launch the VPN Client: Once the VPN client is installed, launch it from your desktop or through the start menu.
-
Login/Create Account: If you have an account with the VPN service, log in using your credentials. If you are a new user, create an account by following the instructions provided by the VPN client.
-
Choose a Server Location: Select a VPN server location from the available options. The optimal server location depends on your specific needs. For example, if you want to unblock geo-restricted content, choose a server in the country where the content is available.
-
Connect to the VPN Server: Click the “connect” or “start” button to establish the VPN connection. Depending on the VPN service, you may need to provide additional authentication, such as a password or fingerprint.
-
Verify the Connection: Once the VPN connection is established, check the VPN client to ensure you are connected to the desired server and that your internet traffic is encrypted.
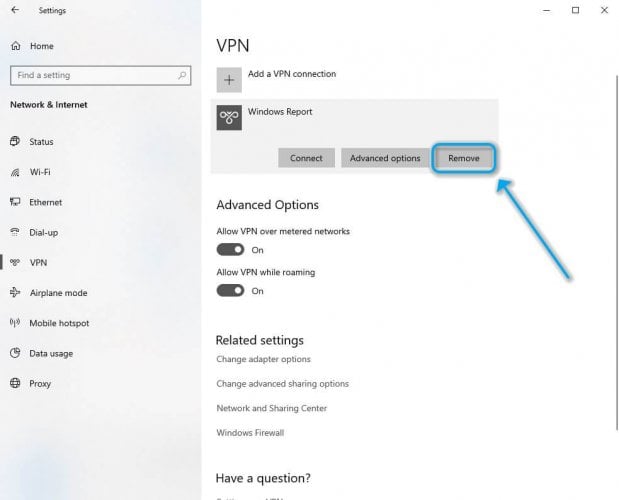
4. Managing Your VPN Connection:
-
Change Server Locations: If you need to connect to a different server location, navigate to the VPN client settings and select the desired server. You can easily switch between different servers as needed.
-
Configure Auto-Connect: Some VPN clients offer an auto-connect feature. By enabling this feature, the VPN connection will automatically establish whenever you connect to a new network, ensuring continuous protection of your online activities.
-
Adjust VPN Settings: Most VPN clients allow you to adjust various settings, such as changing the VPN protocol, enabling split tunneling (allowing specific applications to bypass the VPN), and configuring DNS settings.
-
Troubleshooting Common Issues: If you encounter any issues with the VPN connection, such as slow speeds or connectivity problems, consult the VPN provider’s support documentation or contact customer support for assistance.
5. Best Practices for VPN Usage:
-
Use Strong Passwords: Choose strong and unique passwords for your VPN account and the VPN service itself to prevent unauthorized access.
-
Regularly Update Software: Keep your VPN client and operating system up to date to ensure the latest security patches and features are applied.
-
Be Cautious of Public Wi-Fi: When using public Wi-Fi networks, which are often unencrypted and vulnerable to eavesdropping, always connect to a VPN to protect your data.
-
Monitor VPN Logs: Depending on the VPN service, you may have access to connection logs that provide information about your VPN usage. Regularly review these logs to detect any suspicious activity or potential security breaches.
-
Disconnect VPN When Unnecessary: To optimize internet speed and conserve bandwidth, disconnect the VPN when you are not actively engaged in online activities that require VPN protection.
Conclusion:
This document has provided comprehensive guidance on setting up a VPN connection in Windows 10. By following these steps, users can securely establish a VPN connection, encrypt their internet traffic, and protect their online privacy and security. Whether an individual is concerned about data breaches or wants to bypass geo-restrictions, a VPN offers a valuable solution for secure and private internet access. With a reliable VPN service and proper configuration, users can confidently navigate the digital world, knowing their data and online activities are protected.
Keyword Phrase Tags:
- VPN setup Windows 10
- How to set up VPN in Windows 10
- Windows 10 VPN connection guide
- Secure online browsing with VPN
- Virtual private network Windows 10
Wow, this is great! I’ve been wanting to set up a VPN on my Windows 10 computer for a while now, but I didn’t know how. Thanks for the clear and concise instructions!
I don’t understand a VPN connection is. Is a VPN connection built similarly as a LAN?
Why do you think we need to set up a VPN connection? Is it really true that this would ensure a safer internet browsing?
This is a very helpful guide! I’ve been using a VPN for a while now, but I didn’t know that you could set it up in Windows 10. I’ll definitely be trying this out.
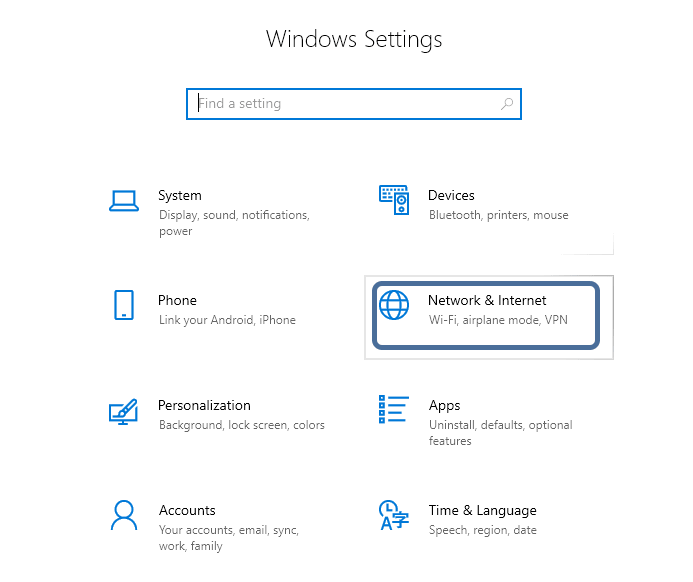
In step two where it says ‘click on ‘Network & Internet’ did you mean to say ‘click on ‘Control Panel’ instead?
Oh wow, this is groundbreaking and insightful! I never knew that I could set up a VPN connection in Windows 10. Thanks for reinventing the wheel!
I’m not sure why I would need a VPN. Do I really need protection from the NSA and hackers trying to steal my Fortnite login?
It’s important to remember that while VPNs can provide an extra layer of security, they are not foolproof. It is still important to practice good security habits, such as using strong passwords and being careful about what websites you visit.
I’ve been using VPNs for years and I can’t imagine browsing the internet without one. They’re essential for protecting your privacy and security online.
I’m still not sure if VPNs are really worth the hassle. I’ve heard that they can slow down your internet connection and make it difficult to access certain websites.
One thing to note is that you can also use a VPN to access region-locked content. For example, if you’re in the US and you want to watch a show that’s only available in the UK, you can use a VPN to connect to a server in the UK and then you’ll be able to watch the show.
It’s funny how we’re all so concerned about our privacy and security online, but we’re willing to give our personal data to companies like Facebook and Google without a second thought.
I’m not really sure what a VPN is, but it sounds like something that only computer whizzes need to worry about. I’ll just stick to using my regular internet connection.