How to Use Windows 10’s Disk Cleanup Tool

Windows 10’s Disk Cleanup tool is a handy utility that can help you free up space on your hard drive by removing unnecessary files. The tool is easy to use and can be accessed in a few different ways.
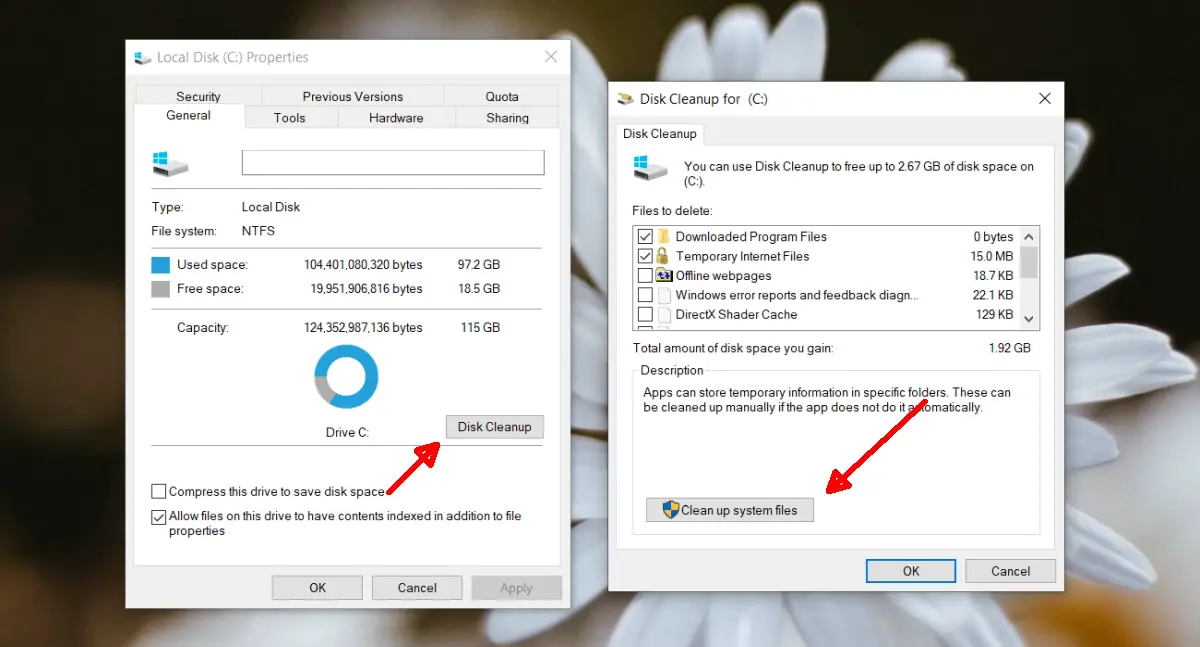
To Open Disk Cleanup:
- Click on the Start button and search “Disk Cleanup.”
- Type “cleanmgr” into the Command Prompt.
- Open the File Explorer and right click on the drive and select “Properties.” Click on the “Disk Cleanup” button.
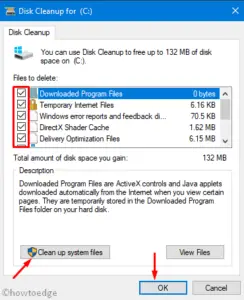
Once you have opened the Disk Cleanup tool, you will see a list of files that can be safely deleted. These files include:
- Temporary files
- Recycle bin files
- Windows error logs
- Old Windows installation files
- Thumbnails
- Downloaded program files
To delete a file, simply select the checkbox next to it and then click on the “OK” button. You may be prompted to confirm that you want to delete the files.
Some additional tips for using the Disk Cleanup tool:
- You can select specific files to delete by clicking on the “Clean up system files” button.
- If you are not sure whether a file can be safely deleted, you can click on the “Description” button to learn more about it.
- The Disk Cleanup tool can also be used to create a system restore point. This can be useful in case you need to revert your computer to a previous state.
By following these tips, you can use the Disk Cleanup tool to safely and easily free up space on your hard drive.# How To Use Windows 10’s Disk Cleanup Tool
Executive Summary:
Harness the power of Windows 10’s Disk Cleanup tool to conquer storage woes and optimize your system’s performance. With disk cleanup’s intuitive interface and automated suggestions tailored to your needs, you can free up valuable storage space, enhance performance, and maintain peak efficiency. Join us as we delve into the intricate workings of this hidden gem and discover how to sweep away junk files, temporary internet files, and redundant language packs to rejuvenate your PC.
Introduction:
In the digital era, managing disk space can be a daunting task. Windows 10 offers a comprehensive solution, the Disk Cleanup tool, that tackles this challenge head-on. This tool assists in reclaiming precious storage space by shedding unnecessary files and boosting system efficiency, making it a must-have for savvy users. Whether you’re dealing with scant storage or a sluggish PC, optimizing your disk space unleashes a world of possibilities.
1. The Temporary Files Takedown:
“Temporary files,” often the culprits of disk clutter, are remnants of programs and processes that outstay their welcome. These files, ranging from outdated updates to error logs, can accumulate insidiously over time, sapping storage space and slowing down your PC’s operation.
- Downloaded Program Files: Invisible space stealers, these files disguise themselves as recent downloads, lurking in the shadows.
- Temporary Internet Files: Traces of your online adventures, these files can amass quickly without you noticing.
- Windows Update Cleanup: Outdated leftovers, these past updates can be safely retired to free up space.
- Error Logs: Occasional witnesses of system mishaps, these logs serve their purpose and can be securely deleted.
- Temporary Files for System Error Reporting: Files from past system crashes can be safely discarded without compromising future reporting.
2. Empty the Recycle Bin:
The Recycle Bin serves as a temporary vault for files awaiting their ultimate fate—permanent deletion. Emptying the Recycle Bin is akin to sweeping excess clutter off your virtual doorstep, keeping your desktop looking neat and your storage organized. When you’re certain that the files consigned to the Recycle Bin serve no further purpose, make it habit to empty its contents, liberating valuable storage space.
- Deleted Files Stay Buried: Once emptied, files are irretrievably gone, ensuring secure disposal.
- Reclaim Valuable Gigabytes: Free up substantial storage space by regularly emptying the Recycle Bin.
- Prevent File Accumulation: Stop files from piling up endlessly, creating an organized virtual environment.
3. Erase Unnecessary Programs:
Unused programs, like unwelcome houseguests, occupy precious disk space and can hinder performance. Removing these programs is akin to decluttering your digital abode, creating space for what truly matters. When programs outlive their utility or are replaced by better alternatives, bid them farewell and reap the benefits of a leaner, more efficient system.
- Identify Unused Programs: Dive into the Control Panel or Settings app to scrutinize installed programs.
- Cull Unused Apps: Uninstall anything you haven’t touched in a while or no longer require.
- Prioritize Critical Software: Keep only the essential programs you actively use, optimizing performance.
4. Prune Outdated Windows Updates:
Windows Updates are essential for maintaining a healthy system, yet previous versions can accumulate and weigh down your storage. Like an attic filled with old newspapers, periodically culling these updates clears space for more pressing matters. By removing superseded updates, you streamline your system, allowing it to run more efficiently and freeing up precious storage space.
- Temporary Windows Update Files: Recent updates leave behind remnants that can be safely removed.
- Previous Windows Versions: Older Windows versions can take up significant space; remove them when no longer needed.
- System Restore and Shadow Copies: Previous restore points consuming space can be trimmed without compromising system integrity.
5. Purge Optional Features and Language Packs:
Windows 10 offers a plethora of optional features and language packs, each requiring a slice of storage. While these additions can enhance functionality, not all may be essential. Like organizing a wardrobe, removing unused components frees up space for what matters most, resulting in a leaner, more tailored system.
- Language Packs Galore: Only keep the languages you actively use to minimize language pack bloat.
- Optional Features on Parade: Carefully evaluate optional features to eliminate those you don’t actively utilize.
- Prioritize Essential Components: Ensure you only retain the features vital to your daily workflow.
Conclusion:
Windows 10’s Disk Cleanup tool is a powerful weapon in your arsenal for combating storage woes and optimizing performance. Armed with this guide, you possess the knowledge to wield this tool effectively, transforming your PC into a lean, mean, storage-saving machine. Regular maintenance using Disk Cleanup keeps your system running smoothly, ensuring ample storage space for your digital endeavors. So, take control of your disk space, say goodbye to digital clutter, and embrace the liberated feeling of a clean and optimized PC.
Keyword Phrase Tags:
- Windows 10 Disk Cleanup
- How To Use Disk Cleanup
- Disk Cleanup Tool
- Optimize Storage Space Windows 10
- Free Up Disk Space Windows 10

This was a great article! It was easy to understand and the tips were very helpful. I was able to clean up my computer and it’s running much faster now. Thanks!
This article was a waste of time. The tips didn’t work for me and my computer is still running slow. I’m very disappointed.
This article provides a good overview of the Windows 10 Disk Cleanup tool. However, it could be improved by including more detailed instructions on how to use the tool. For example, it would be helpful to know how to select the specific files and folders that you want to delete.
I disagree with the author’s claim that the Windows 10 Disk Cleanup tool is the best way to clean up your computer. I believe that there are other tools that are more effective and easier to use.
This article is a great example of how to write a useless article. The tips are so vague and general that they could apply to any computer cleaning tool.
Wow, this article is really helpful. I can’t believe I didn’t know about this tool before. Thanks for the great tips!
I tried using the Windows 10 Disk Cleanup tool, but it didn’t do anything. I guess my computer is just too messy.
This article is a great resource for anyone who wants to learn how to use the Windows 10 Disk Cleanup tool. The tips are clear and easy to follow.
I’m not sure how to use this tool. Can someone please help me?
I can’t wait to try this tool! I’ve been looking for a way to clean up my computer.
I’m not sure if this tool will really work. I’ve tried other cleaning tools before and they haven’t worked very well.