How to Use Snap Assist to Boost Productivity in Windows 10
Snap Assist is a powerful feature in Windows 10 that allows you to quickly and easily arrange your open windows on the screen. This can be a great way to boost your productivity, as it lets you see multiple windows at once and easily switch between them.
To use Snap Assist, simply:
- Click and hold the title bar of a window and drag it to one of the four corners of the screen.
- Release the mouse button to snap the window to that corner.
- Repeat steps 1 and 2 with additional windows to snap them into place.
You can also use Snap Assist to:
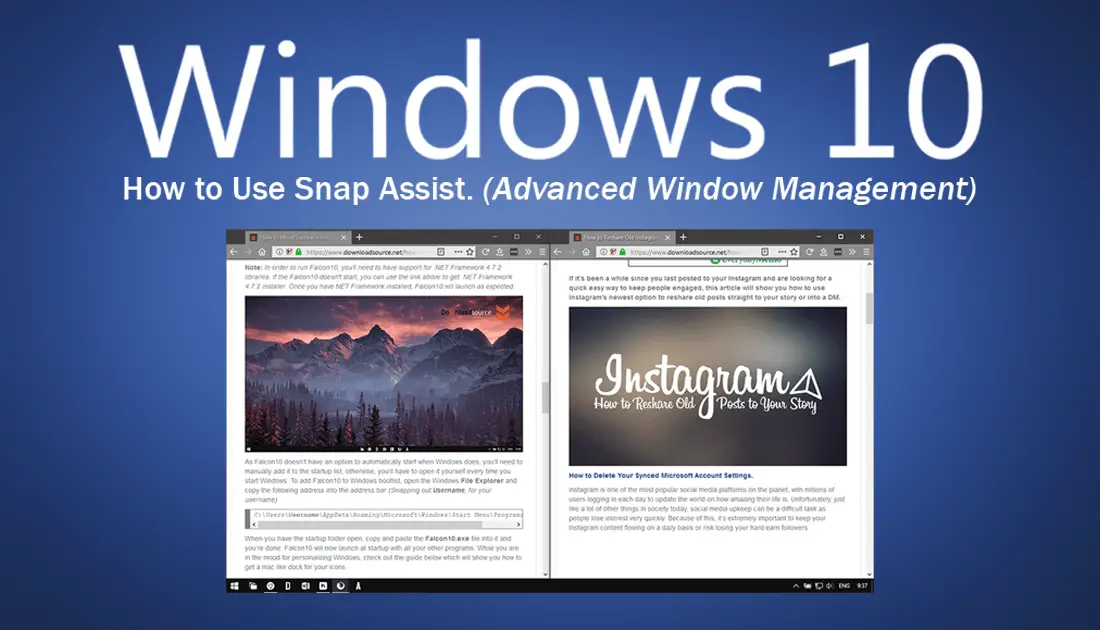
- Create side-by-side windows. To do this, drag a window to the left or right edge of the screen. Windows 10 will automatically resize the window to take up half of the screen. You can then drag another window to the other side of the screen to create a side-by-side view.
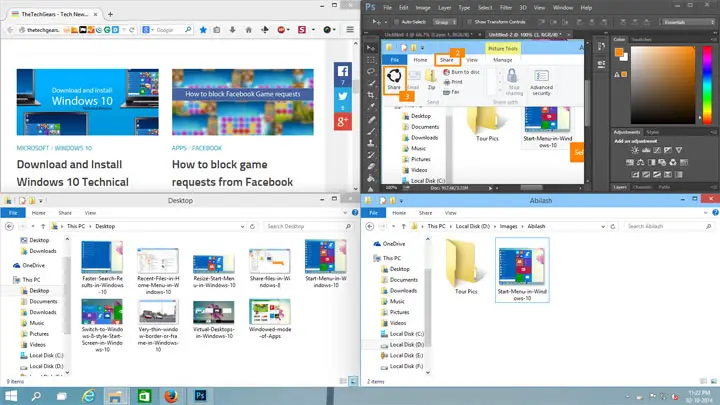
- Create cascading windows. To do this, drag a window to the top of the screen. Windows 10 will automatically resize the window to take up the top half of the screen. You can then drag additional windows below the first window to create a cascading view.
- Maximize a window. To do this, drag a window to the top of the screen and then release the mouse button. Windows 10 will automatically maximize the window to take up the entire screen.
Snap Assist is a versatile tool that can be used to improve your productivity in a variety of ways. With a little practice, you’ll be able to use Snap Assist to quickly and easily arrange your windows on the screen, which can help you save time and get more done.
Here are some additional tips for using Snap Assist:
- Use keyboard shortcuts. You can use keyboard shortcuts to quickly snap windows into place. For example, you can press the Windows key + Left Arrow to snap a window to the left edge of the screen, or you can press the Windows key + Up Arrow to snap a window to the top of the screen.
- Use the Aero Snap feature. Aero Snap is a feature that allows you to automatically snap windows into place by dragging them to the edges of the screen. To enable Aero Snap, open the Settings app and go to System > Multitasking. Under the “Snap windows” section, turn on the “Aero Snap” toggle switch.
- Use the Task View button. The Task View button is located on the taskbar. When you click the Task View button, you’ll see a list of all of your open windows. You can then click on a window to bring it into focus, or you can drag a window to the left or right edge of the screen to snap it into place.## How To Use Snap Assist To Boost Productivity In Windows 10
Executive Summary
Snap Assist is a powerful feature in Windows 10 that allows users to quickly and easily organize their windows for improved productivity. This feature enables users to snap windows into predefined zones on the screen, creating a more efficient and visually appealing workspace. This article explores five key aspects of Snap Assist and provides detailed guidance on how to utilize this feature to maximize productivity in Windows 10.
Introduction
In today’s fast-paced work environment, maximizing productivity is crucial. Windows 10 offers a range of features that can help users streamline their workflow and enhance their efficiency. One such feature is Snap Assist, which provides users with the ability to arrange their windows in organized and convenient ways that can significantly boost their productivity.
Snap Windows for Quick and Efficient Organization
Snap Assist enables users to snap windows into various predefined zones on the screen. This feature can be accessed by dragging a window to the edge of the screen, which prompts the system to display available snapping zones. By dropping the window into one of these zones, it will automatically resize and align itself to fit the chosen space. This process allows users to quickly organize their windows, creating a structured and clutter-free workspace.
Multiple Zone Snapping:
- Allows users to snap multiple windows into different zones on the screen.
- Maximizes screen space by efficiently arranging windows side-by-side or on top of each other.
- Enhances multitasking by enabling users to view and access multiple applications simultaneously.
Snap Grouping:
- Enables users to group similar or related windows together.
- Maintains related windows in close proximity, improving organization and ease of access.
- Simplifies task management and reduces the need to constantly switch between windows.
Snap Assist Shortcuts:
- Provides keyboard shortcuts for snapping windows, making the process quick and effortless.
- Allows users to quickly snap windows to predefined zones using specific key combinations.
- Enhances productivity by minimizing the time spent dragging and resizing windows manually.
Fancy Zones:
- Extends the capabilities of Snap Assist with advanced customization options.
- Enables users to create custom snapping zones with specific sizes and arrangements.
- Offers greater flexibility in organizing windows according to personal preferences or workflow needs.
Multi-Monitor Support:
- Supports multiple monitors, providing enhanced multitasking capabilities.
- Allows users to snap windows across different monitors, extending workspace and optimizing efficiency.
- Facilitates seamless multitasking by enabling users to easily move and view windows across multiple screens.
Conclusion
Snap Assist is a versatile and powerful tool that can greatly enhance productivity in Windows 10. By utilizing the various snapping zones, users can organize their windows in a structured and efficient manner. This feature allows for quick and easy multitasking, enhances organization, and simplifies task management. With the advanced customization options available, users can tailor Snap Assist to suit their specific workflow needs, further maximizing their efficiency and productivity in Windows 10.
Keyword Phrase Tags
- Snap Assist
- Windows 10 Productivity
- Window Management
- Snap Zones
- Multitasking Enhancements
This is a excellent article. I’ve been impersonate Windows 10 for the few years now and never knew about this feature. I’ll definetly be using in the future. Am I able to use this in Windows 8 to?
this is Useless! this should have been introduced back in windows seven!!! i never understood why my windows havent been working properly but it is more than obvious to me now, they want us to buy new computers.
This article is not valid anymore, An improved version of Snap Assist was included in the Windows 11 2022 Update. With the updated version, you can snap windows into zones on your screen. The new zones include the following:
Left zone
Right zone
Top zone
Bottom zone
The zones make it easier to organize your windows and can help you to be more productive.
I am not enitrely sure what Snap Assist is good four, I use my computer to play games and write. Maybe this would be good if I used for buisness.
Is it possible to snap assist only one window to take up a quarter screen, instead of half?
So, I just drag windows over, I thought you had to download some type of snap magnet program. LOL
Does This Work on Windows Xp?? Using a 98 at the moment and wanted to upgrade just have not been able to yet.
This. This is what I was missing! I’ve been having issues having multiple windows up and only being able to see half of them to I thought i might have needed to upgrade to a brand-new computer, But this has helped me soe much!
I use my computer for video editing and having multpile windows shows at the same time would slow down my computer to much. Maybe windows 11 has something that can fix that but windows 10 is terrible.