How to Create and Manage Virtual Hard Disks (VHDs) in Windows 10
Virtual hard disks (VHDs) are virtual storage devices that can be created on your physical hard drive. They can be used to store operating systems, data, or applications, and can be mounted and used just like a physical hard drive.
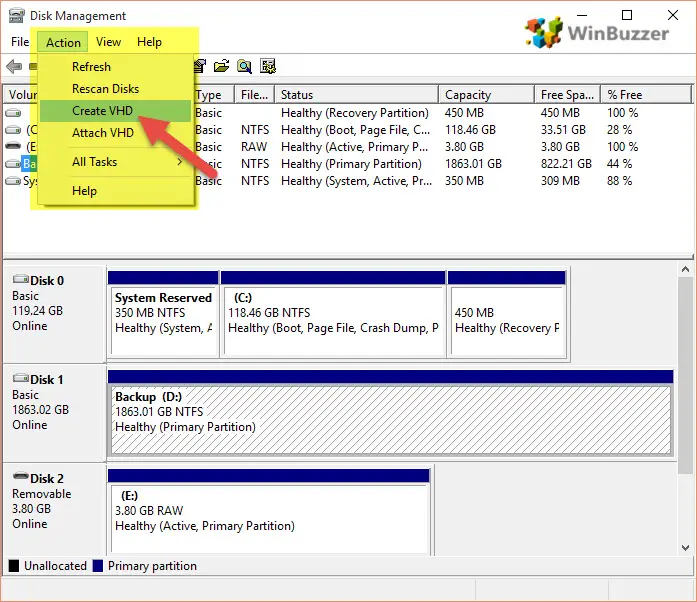
To create a new VHD, open the Disk Management tool by pressing Windows Key + R and typing diskmgmt.msc. In the Disk Management tool, follow these steps:
- Right-click on the physical disk where you want to create the VHD, and select New Virtual Hard Disk.
- In the New Virtual Hard Disk wizard, specify the following settings:
- Location: Enter the path and filename for the VHD file.
–Size: Specify the size of the VHD in MB, GB, or TB.
–Format: Select the file system format for the VHD (NTFS, FAT32, or exFAT).
- Click Create to begin creating the VHD.
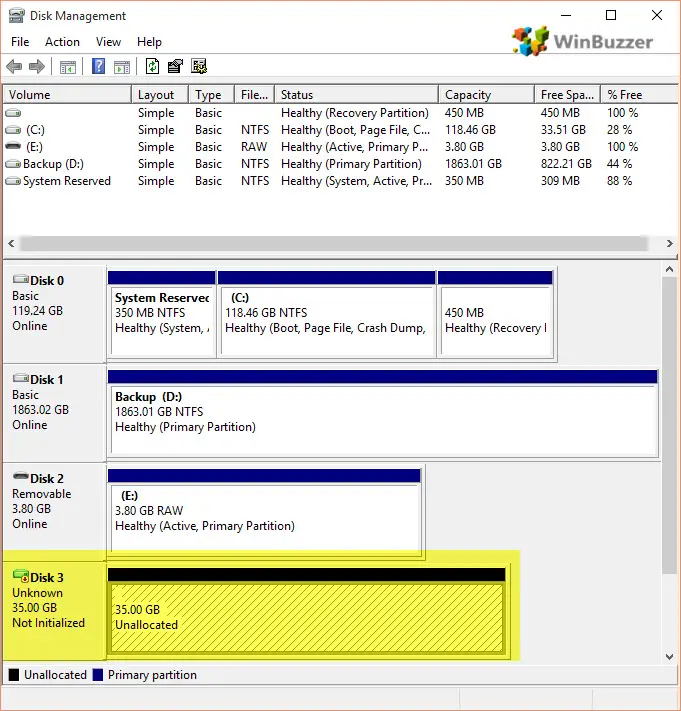
Once the VHD has been created, it will appear in the Disk Management tool as an unallocated drive. To format and use the drive:
- Right-click on the VHD and select Initialize Disk.
- In the Initialize Disk wizard, select the partition style (MBR or GPT) for the VHD.
- Click OK to initialize the VHD.
- Right-click on the VHD and select New Simple Volume.
- In the New Simple Volume wizard, specify the following settings:
- Volume label: Enter a name for the VHD.
–File system: Select the file system format for the VHD (NTFS, FAT32, or exFAT).
–Allocation unit size: Select the allocation unit size for the VHD.
–Volume size: Specify the size of the volume in MB, GB, or TB.
- Click Next and then Finish to format and mount the VHD.
Once the VHD has been formatted and mounted, you can use it just like any other physical hard drive. You can create partitions, format it with different file systems, and store data or applications on it.
To manage VHDs, you can open the Disk Management tool and perform the following tasks:
–Create: Create new VHDs of various sizes and formats.
–Attach: Mount existing VHDs so that they appear as physical drives.
–Detach: Unmount VHDs so that they are no longer accessible.
–Convert: Convert VHDs between different file system formats, such as FAT32 to NTFS or vice versa.
–Delete: Delete VHDs that are no longer needed.
VHDs are a powerful tool that can be used to extend the storage capacity of your computer, create virtual environments, or store important data. By understanding how to create and manage VHDs, you can take advantage of their many benefits.## How To Create And Manage Virtual Hard Disks (vhds) In Windows 10
Executive Summary
This article provides a comprehensive guide to creating and managing Virtual Hard Disks (VHDs) in Windows 10. It covers key concepts, step-by-step instructions, and best practices for utilizing VHDs effectively. Whether you’re a novice or an experienced user, this guide will empower you to leverage VHDs to enhance your data management and storage capabilities.
Introduction
Virtual Hard Disks (VHDs) are versatile files that emulate physical hard drives within a virtual machine environment. They offer numerous advantages, including data isolation, portability, and ease of deployment. In Windows 10, VHDs can be easily created and managed using the Disk Management utility.
Creating a VHD
1. Open Disk Management
- Press Windows Key + R to open the Run dialog.
- Type diskmgmt.msc and press Enter.
2. Initialize the New Disk
- Right-click on the unallocated space in the Disk Management window.
- Select Initialize Disk.
- Choose MBR (Master Boot Record) or GPT (GUID Partition Table) and click OK.
3. Create the VHD
- Right-click on the initialized disk.
- Select Create VHD.
- Specify the desired Location, Size, and Format of the VHD.
- Click OK to create the VHD.
Mounting a VHD
1. Open Disk Management
- Press Windows Key + R to open the Run dialog.
- Type diskmgmt.msc and press Enter.
2. Mount the VHD
- Right-click on the VHD file.
- Select Attach VHD.
- The VHD will mount as a new drive in Disk Management.
Expanding a VHD
1. Open Disk Management
- Press Windows Key + R to open the Run dialog.
- Type diskmgmt.msc and press Enter.
2. Expand the VHD
- Right-click on the mounted VHD.
- Select Expand Volume.
- Specify the desired Size of the expanded VHD.
- Click OK to expand the VHD.
Detaching a VHD
1. Open Disk Management
- Press Windows Key + R to open the Run dialog.
- Type diskmgmt.msc and press Enter.
2. Detach the VHD
- Right-click on the mounted VHD.
- Select Detach VHD.
- The VHD will be detached from the system.
Snapshots
1. Shadow Copies (Windows 7 and above)
- Shadow Copies allows you to create snapshots of VHDs for rollback purposes.
2. Create a Snapshot
- Right-click on the VHD in Disk Management.
- Select Create VHD Snapshot.
- Choose a Snapshot Location and Snapshot Name.
- Click OK to create the snapshot.
3. Rollback to a Snapshot
- Right-click on the snapshot in Disk Management.
- Select Merge VHD.
- The VHD will be restored to the snapshot state.
Conclusion
Virtual Hard Disks (VHDs) in Windows 10 provide a powerful and efficient way to manage storage and data. By following the steps outlined in this guide, you can create, manage, expand, and detach VHDs with ease. The ability to create snapshots adds an extra layer of data protection and flexibility. Understanding and leveraging these techniques will significantly enhance your data management capabilities and optimize your virtual machine environment.
Keyword Phrase Tags
- VHDs in Windows 10
- Create and manage VHDs
- Expand VHDs
- Detach VHDs
- VHD snapshots
very very very usefullll
Great article! Thanks for sharing!
This is a great way to expand the storage capacity of your computer.
This is not a good way to expand the storage capacity of your computer.
I’m not sure if this is a good idea.
This is a very interesting idea.
I’m not sure if this is a good idea, but I’m willing to try it.
This is a very interesting idea, but I’m not sure if it will work.
This is a very interesting idea, but I’m not sure if I can do it.