Creating and Managing User Accounts in Windows 10

Windows 10 allows multiple users to share a single computer. Each user can have their own personalized settings, files, and programs, and they can log in and out of the computer independently.
To create a new user account, open the Settings app and go to “Accounts > Family & other users.” Click on “Add someone else to this PC.” You’ll then be prompted to enter the new user’s name and email address. You can also choose whether to create a Microsoft account or a local account.
Microsoft accounts are linked to a Microsoft email address and allow users to access Microsoft services such as OneDrive, Office 365, and Xbox Live. Local accounts are not linked to a Microsoft email address and can only be used to log in to the local computer.
Once you’ve created a new user account, you can customize it by clicking on “Change account type” and selecting “Administrator” or “Standard user.” Administrators have full control over the computer, while standard users have limited privileges.
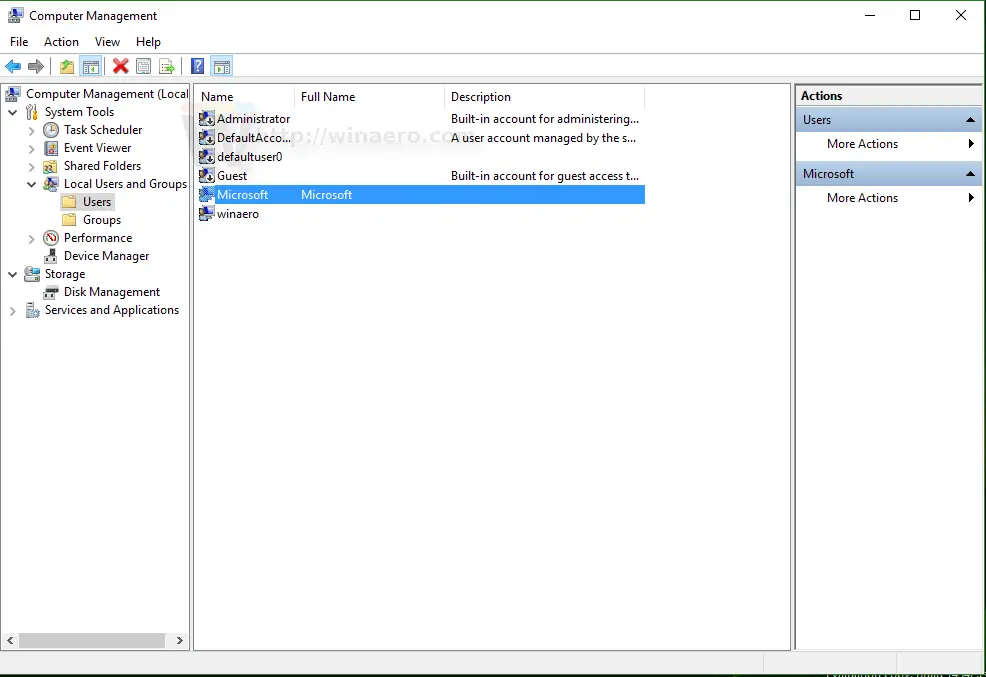
You can also manage existing user accounts by clicking on “Manage other accounts.” From here, you can change a user’s account type, reset their password, or delete their account.
It’s important to create strong passwords for all user accounts. A strong password is at least 12 characters long and includes a mix of uppercase and lowercase letters, numbers, and symbols. You should also avoid using common words or phrases.
To change a user’s password, open the Settings app and go to “Accounts > Sign-in options.” Click on “Password” and then enter the old and new passwords.
You can also reset a user’s password if they’ve forgotten it. To do this, open the Settings app and go to “Accounts > Sign-in options.” Click on “Forgot my password” and then follow the instructions on the screen.
If you need to delete a user account, open the Settings app and go to “Accounts > Family & other users.” Click on the user account you want to delete and then click on “Remove.” You’ll then be prompted to confirm that you want to delete the account.# Creating and Managing User Accounts in Windows 10
Executive Summary
User accounts play a vital role in Windows 10, allowing multiple users to access a single computer while maintaining individualized settings, preferences, and access permissions. This article provides a comprehensive guide to creating, managing, and customizing user accounts in Windows 10.
Introduction
Windows 10 offers various types of user accounts, each with distinct features tailored to specific purposes. These include standard user accounts, administrator accounts, and guest accounts. Understanding the differences between account types and their appropriate uses is essential for maintaining a secure and efficient Windows environment.
Creating a User Account
- Open Settings: Access the Settings menu via the Start menu or by pressing the Windows + I keyboard shortcut.
- Navigate to Accounts: Click on the “Accounts” option from the Settings menu.
- Access Family & Other Users: Select the “Family & Other Users” tab.
- Add a User: Click on the “Add Someone Else to this PC” button.
- Enter User Information: Provide the necessary information, such as the user’s name, email address (for Microsoft accounts), and desired password.
Managing User Accounts
- View User Accounts: In the “Family & Other Users” settings, a list of user accounts will be displayed.
- Change Account Type: Right-click on a user account and select “Change Account Type” to modify its permissions and privileges.
- Set Password: Click on the “Change Password” option to set or reset a user’s password.
- Grant Administrator Privileges: Select the “Make This Person an Administrator” checkbox to grant an account full control over the computer.
- Enable or Disable User: Disable user accounts to prevent access or enable them when necessary.
Account Types and Security
- Standard User Account: Designed for basic users, standard accounts have limited permissions, providing increased security by preventing unauthorized changes to system settings.
- Administrator Account: Grants full control over the computer, including the ability to install software, manage other accounts, and modify system settings.
- Guest Account: A temporary account for visitors or guests, providing limited access to the computer.
- Microsoft Account: When linked to a Microsoft account, users can access Windows Store apps, sync settings across multiple devices, and benefit from additional security features.
Account Customization
- Change Account Picture: Set a custom profile picture to personalize the user’s account appearance.
- Configure Privacy Settings: Adjust privacy settings to control data sharing and access to personal information.
- Create a PIN or Biometric ID: For increased security, create a numerical PIN or use a biometric identifier, such as a fingerprint or facial recognition, for user authentication.
Conclusion
Understanding how to create and manage user accounts in Windows 10 is crucial for maintaining a secure and efficient computing environment. By following the steps and best practices outlined in this article, users can effectively manage access permissions, customize their accounts, and ensure the integrity of their system.
Keyword Phrase Tags
- Windows 10 User Accounts
- Managing User Accounts
- Creating User Accounts
- Account Types
- Security and Permissions
I’m having trouble creating a new user account. Can you help me?
This is a great article! I learned a lot about creating and managing user accounts in Windows 10.
I disagree with the author’s opinion on the best way to manage user accounts. I think the best way is to use a local account.
I’m not sure I understand the author’s instructions. Can someone please explain them to me?
This article is so well-written! The author did a great job of explaining a complex topic in a clear and concise way.
I’m having trouble logging into my user account. Can someone help me?
This article is a waste of time. The author doesn’t provide any new information.
I’m not sure why the author is making this so complicated. Creating and managing user accounts in Windows 10 is easy.
I’m not sure what the author is trying to say. This article is all over the place.