
Creating a Recovery Drive and Reinstalling Windows 10
A recovery drive is a USB flash drive or an external hard drive that contains the necessary files to repair or reinstall Windows 10 if it becomes corrupted or damaged. It can be especially useful if your computer is unbootable and you cannot access the operating system. Here’s a detailed guide on how to create a recovery drive and reinstall Windows 10:
Creating a Recovery Drive:
- Insert a USB flash drive or connect an external hard drive with at least 8GB of storage space.
- Go to the Windows search bar and type “Create a recovery drive.”
- Click on the “Create a recovery drive” tool.
- Select the USB flash drive or external hard drive as the destination.
- Ensure the “Back up system files to the recovery drive” option is checked.
- Click on “Create” to start the process.
Reinstalling Windows 10:
- Disconnect all external peripherals and shut down your computer.
- Insert the recovery drive or connect the external hard drive containing the recovery files.
- Power on the computer and press the key indicated on the screen to boot from the recovery drive (usually F1, F2, F10, or F12).
- Choose the language and keyboard layout.
- Click on “Troubleshoot.”
- Select “Reset this PC” or “Advanced options.”
- Choose “Reset this PC” to perform a clean installation or “Advanced options” for more recovery options.
- Follow the on-screen prompts to complete the reinstallation process.
Additional Tips:
- Use a high-quality USB flash drive or external hard drive to create the recovery drive.
- Test the recovery drive to ensure it works correctly before relying on it in an emergency.
- Store the recovery drive in a safe and easily accessible location.
- Regularly update your recovery drive to include the latest system files and updates.
- If you encounter any issues during the recovery process, refer to the Microsoft support website or contact Microsoft support for assistance.# Creating A Recovery Drive And Reinstalling Windows 10
Executive Summary
Microsoft Windows 10 is an operating system that takes a more personalized operational approach for user-friendly applications. The system goes through constant updates to improve user experience and expand capabilities. Over time, this can sometimes lead to minor performance issues. In certain cases where troubleshooting isn’t able to correct the issue, carrying out a complete system reinstallation becomes necessary.
This article will break down the steps to create a recovery drive, allowing users to reinstall Windows 10 if necessary.
Introduction
Microsoft Windows 10 is a versatile operating system that meets the demands of various users and organizations. However, like any software, Windows 10 may occasionally experience issues that can hinder its performance and functionality. While minor issues can often be resolved through troubleshooting, there may be instances where a complete reinstallation of the operating system is necessary. Utilizing a recovery drive offers a quick way to reinstall Windows 10, ensuring that the system is restored to its optimal operational condition.
Necessary Prerequisites Before Creating A Recovery Drive
Prior to crafting a recovery drive, certain system health practices must be upheld:
-
Backup Crucial Data: Safeguarding personal data is paramount. Utilize external hard drives, cloud storage services or memory sticks to preserve files, documents and media.
-
Secure Product Key Information: The Windows 10 product key serves as a unique identifier for each license. Safely store this information. It is crucial to ensure continued access to the key during the reinstallation process.
-
Establish An Internet Link: Prioritize a stable internet connection throughout the reinstallation process. This will not only lubricate the download of any essential updates but also expedite the reinstallation procedure itself.
Step-By-Step Guide To Crafting A Recovery Drive
Here’s a methodical approach to creating a recovery drive:
1. Establish A Usb Drive Of At Least 16 Gb Capacity:
- Ensure that the drive is formatted in FAT32 or NTFS format to ensure compatibility.
- Back up any existing data on the drive to an alternative location, as the creation of the recovery drive will erase its contents.
2. Plug In The Usb Drive To A Functional Usb Port:
- Make sure the USB port is functional and compatible with the USB drive.
- Confirm that the drive is properly detected and recognized by the system.
3. Utilize The Windows Search Bar:
- Type “Create a recovery drive” into the Windows search bar and select the most appropriate option.
- This action will open the “Create a recovery drive” dialog box.
4. Choose The Usb Flash Drive:
- The recovery drive creation tool will display a list of compatible USB flash drives connected to the system.
- Select the preferred USB drive from the available options.
5. Press The “Next” Button:
- Verify the selected USB flash drive and confirm readiness to proceed by clicking the “Next” button.
6. Leave The “Back Up System Files To The Recovery Drive” Box Unchecked:
- Ensure this checkbox remains unmarked to avoid copying personal files to the recovery drive.
- This will significantly expedite the recovery drive creation process.
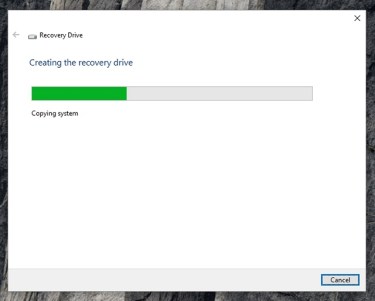
7. Select The “Next” And “Create” Buttons:
- Proceed with the recovery drive creation process by clicking “Next” and then “Create”.
- Depending on the speed of the USB drive, the process may take a few minutes to complete.
8. Choose The “Finish” Button:
- Once the recovery drive is prepared, the “Finish” button appears. Click it to conclude the process.
9. Preserve The Recovery Drive In A Secure Location:
- Store the bootable recovery drive in a safe place for use if the need for reinstalling Windows 10 arises.
- Ensure its accessibility in case of a system-related emergency.
Crucial Steps Involved In Reinstalling Windows 10 Using A Recovery Drive
To execute a successful Windows 10 reinstallation using a recovery drive, follow these steps:
1. Boot The Computer From The Recovery Drive:
- Connect the USB recovery drive to the system.
- Power on the computer while pressing the boot menu key, which often is F1, F2, F8, F10 or Esc (depending on the manufacturer).
- Navigate to the boot menu and select the USB drive as the boot device.
- The system will boot from the recovery drive.
2. Choose The Preferred Language And Keyboard Layout:
- After booting, you’ll be presented with language and keyboard selection options.
- Select the appropriate language and keyboard layout.
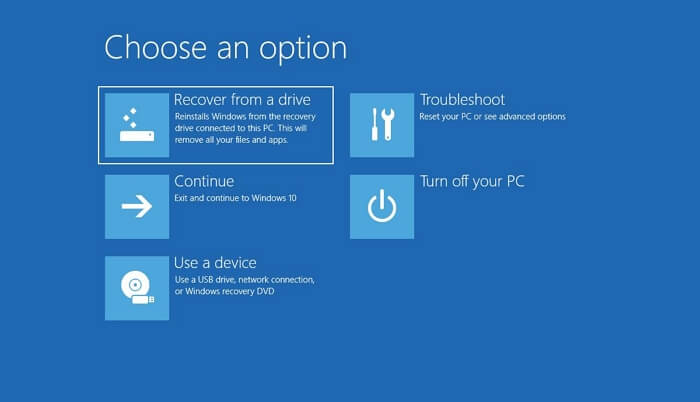
3. Click On “Troubleshoot”:
- Locate and click the “Troubleshoot” option from the available choices.
4. Choose “Recover From A Drive”:
- From the “Troubleshoot” section, select “Recover from a drive”.
5. Press “Next”:
- Select the appropriate target drive for the Windows 10 reinstallation by pressing “Next”.
6. Confirm Readiness To Reinstall Windows:
- A confirmation prompt will appear, requesting your approval to reinstall Windows.
- Read the message carefully and click on the “Reinstall” button to proceed.
7. Allow The Reinstallation Process To Run Its Course:
- The reinstallation process will now commence.
- This may take some time, typically within 30 minutes to 2 hours, depending on system specifications.
8. Set Up Your Reinstalled Windows:
- After successful reinstallation, follow the on-screen instructions to set up the reinstalled Windows 10 system.
- This includes tasks like setting up a user account, connecting to the internet, and personalizing some settings.
Conclusion
Creating a recovery drive and reinstalling Windows 10 are important processes that ensure the continued functionality of the operating system. Following the outlined steps, users can create a recovery drive that can be utilized to reinstall Windows 10, even in instances where the system fails to boot properly. Regularly backing up data, having a stable internet connection, and securely storing product key information are crucial points to emphasize. By understanding these processes, users can maintain a healthy and reliable Windows 10 environment, resolving system issues and restoring optimal performance when necessary.
Keyword Phrase Tags
- Windows 10 recovery drive
- Create a recovery drive in Windows 10
- Reinstall Windows 10 using a recovery drive
- How to reinstall Windows 10
- Restore Windows 10 to factory settings
Great, everything explained in detail
This is not clear enough, how can I know more
Not useful at all since I don’t use Windows 10
For windows 8, is the procedure exactly the same
Can I restore my computer in any other way
That’s not the right way to reinstall windows 10
It might take forever, Are you sure about this way
Can somebody post an alternative way to format my laptop?
Why don’t we just throw the old computer out and get a new one?
I didn’t understand a thing -_-
Anyone know of any resources on how to upgrade to Windows 10?
Don’t press that button or you’ll lose access to everything
I’ve been using Windows 10 for years and never had a problem with it
I’m not sure if this will work on my old computer.